How to flash Xperia Z2/Z3 Lollipop 23.1.A.0.690 ftf using Flashtool Manually ?

Sony rolled Android 5.0.2 Lollipop update on Xperia Z2 and Xperia Z2 Tablet globally yesterday and many users from different regions around the world are now confirming it. So far only Xperia Z3 series and Xperia Z2 series have got Lollipop update.

Yesterday we explained how to download Lollipop firmware using XperiFirm tool, if you haven’t got it yet and today we will let you know how to flash manually Lollipop firmware ftf on your Xperia device.

How to flash Xperia Z2 Lollipop 23.1.A.0.690 ftf?

XperiFirm Tool is used to download Lollipop (or any ordinary firmware) firmware bundle and then creating “firmware ftf” using Flashtool (steps mentioned in this tutorial, use XperiFirm tool if you haven’t got firmware update yet via PC Companion or OTA or you just need ftf file).

How to download Lollipop firmware via XperiFirm Tool and creating ftf using Flashtool?

Now we will use Flashtool to flash manually firmware ftf.

Facts to know:

  • Flashing firmware ftf file on your Xperia device doesn’t void warranty.
  • Flashing ftf file doesn’t require unlocking bootloader of your Xperia device.
  • No root needed.

Pre-requisites:

  • Xperia device.
  • USB cable.
  • PC.
  • Firmware ftf file.

You should do?

  • Take a backup of all your data via PC Companion.

NOTE: We will explain the tutorial taking Xperia Z2 and flashing 23.1.A.0.690 ftf on it. Steps are similar for every Xperia handset on any firmware.

Step 1 – Download Flashtool

Download Flashtool version 0.9.18.5 (or the latest available) from here.

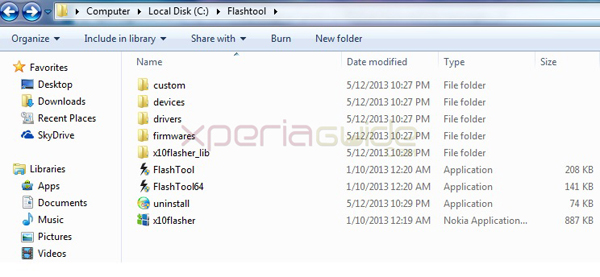
After downloading above Flashtool, install it.

On opening it, it may ask you to move files stored in F:\Flashtool\firmwares to F:\Users\PC NAME\.flashTool\firmware (Do move the ftf stored if asked to do so).

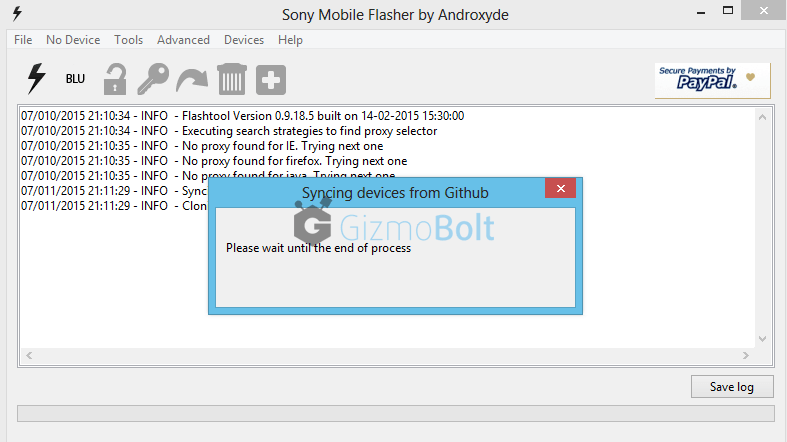
Wait then till it syncs the devices list (if it don’t syncs because you are not connected to internet, then leave it. It is not mandatory to do sync).

Create ftf via FlashTool

How to use Xperia Flashtool to update Lollipop

Step 2 – Download Firmware Ftf file

For D6502 INDIA region

Download D6502_23.1.A.0.690_INDIA_GIZMOBOLT.ftf

Step 3 – Put your above download firmware ftf in “F:\Users\PC NAME\.flashTool\firmware” folder

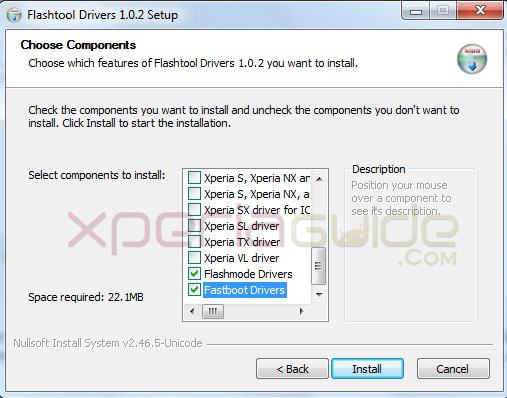
Additional Step :- Install Drivers

Install Drivers from the folder named “Flashtool Drivers” in the location where Flashtool is installed OR just install PC Companion on your PC and connect your device with it and then remove it.

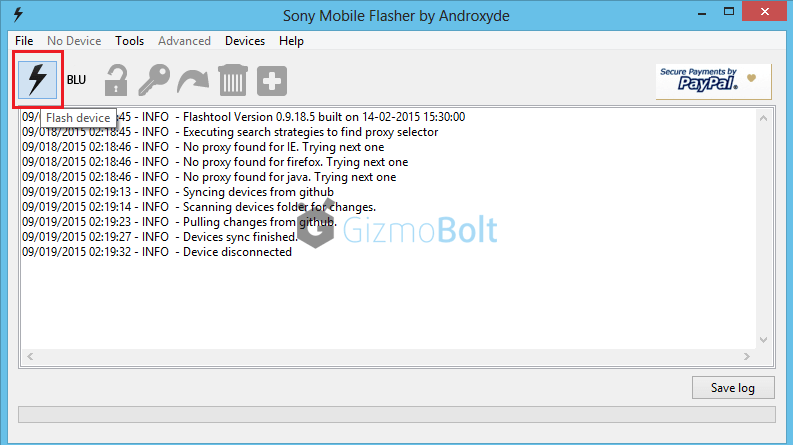
Step 4 – Open FlashTool

Now Open Flashtool. See the “Black Lightning Thunder icon” at the top left corner. Click on it.

How to flash Xperia Z2 Lollipop firmware

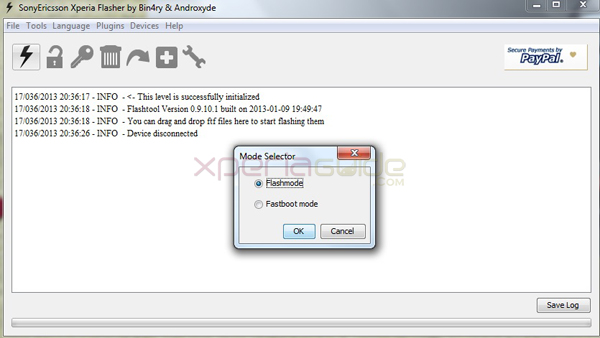
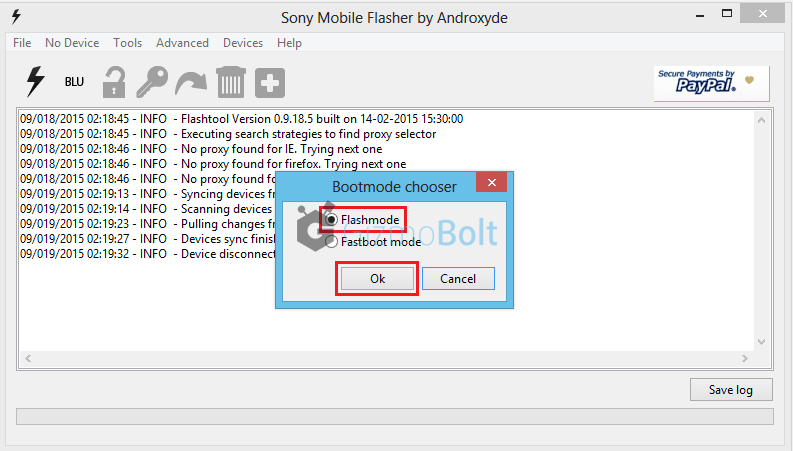
Step 5 – Choose Flashmode from Bootmode chooser

Now choose flashmode from given two options.

Xperia Z2 Lollipop firmware flashing manually

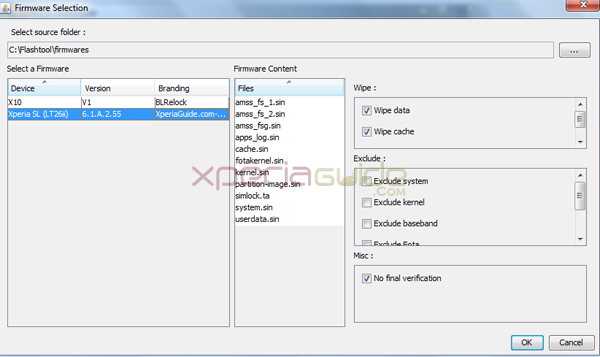
Step 6 – You will now automatically see your download firmware ftf file in the “firmware” section (left hand side) of Flashtool window. Select your firmware.

Step 7 – Wipe data if you wish

See the right hand side of window under the “Wipe” tag, all three options are checked if, will delete all user data.

How to flash 23.1.A.0.690 firmware on Xperia Z2 using Flashtool

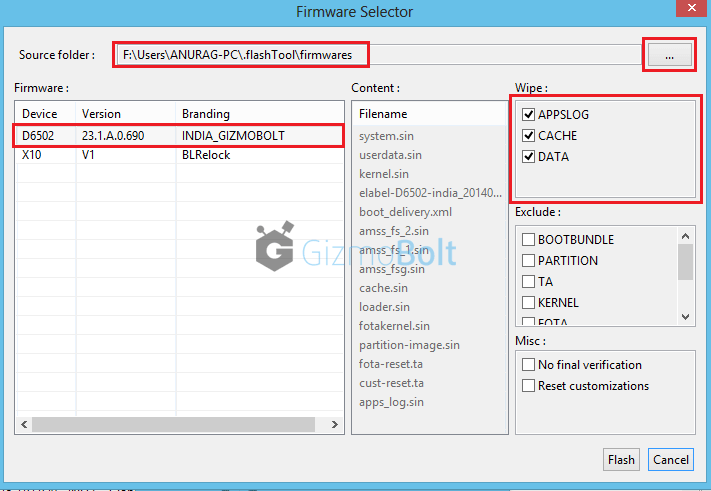
So if you don’t want to delete all user user data and don’t want a factory reset then you should uncheck them.

Flash Lollipop 23.1.A.0.690 ftf on Xperia Z2

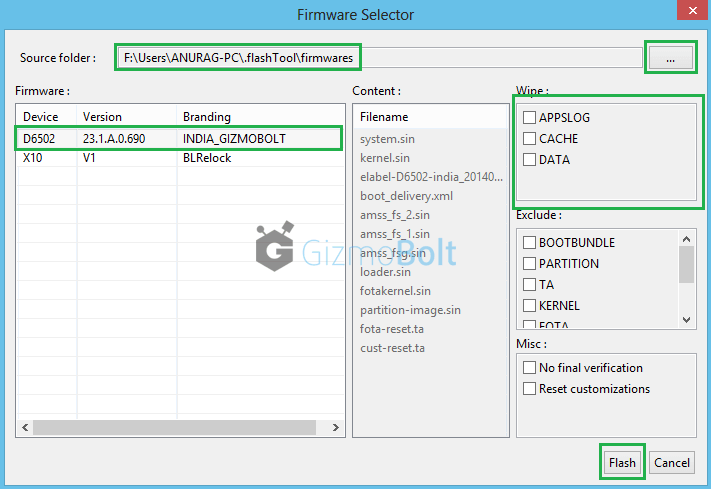
Wiping full data is recommended, though (if you have backup).

Do it: Click on “Flash” button.

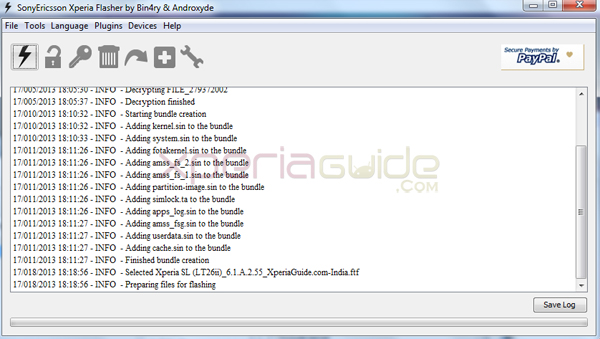
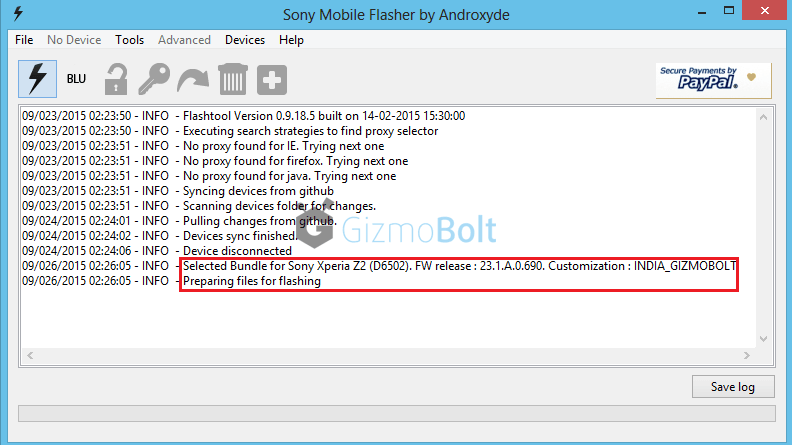
Step 8 – Preparing files for flashing

After clicking on “Flash” Button in above step, now FlashTool will prepare firmware ftf selected for flashing.

How to update Xperia Z2 on Android Lollipop

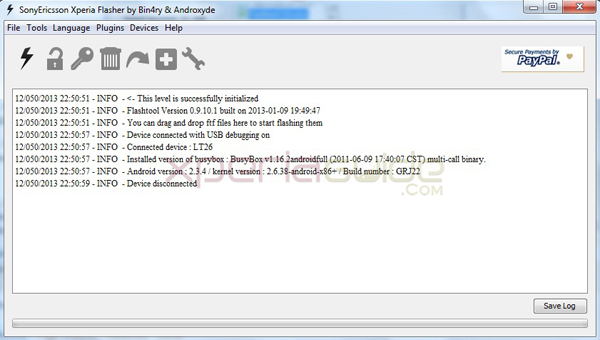
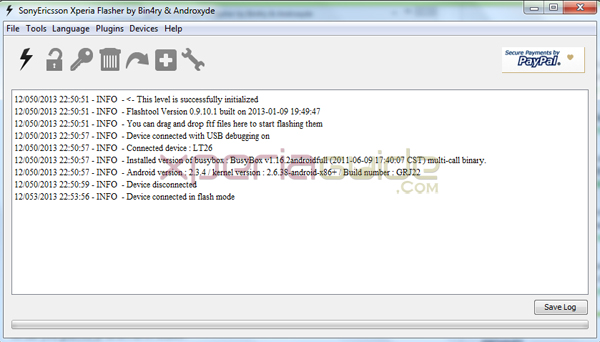
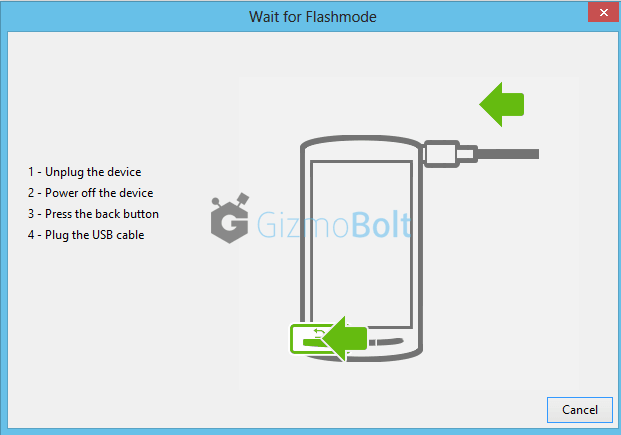
Step 9 – Connecting phone in FlashMode.

Important: Now enable USB Debugging on your phone and enable unknown sources option in your Xperia device and switch it off.

When prompted the notification of connecting your phone, connect it in flashmode (as chosen above)

How to do ? Press Volume down button and then insert usb in phone, you will see red and green light blink once, it means phone is connected in flashmode now.

How to connect Xperia Z2 in flashmode

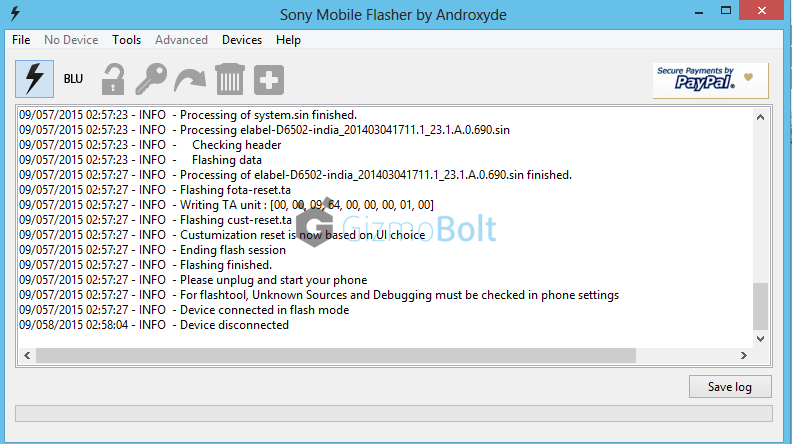
As soon as phone is detected by Flashtool, flashing beings and wait till it is finished.

WARNING: Do not cancel the process in between once flashing has started or it will result in boot loop or device not booting up at all.

Update Xperia Z2 on 23.1.A.0.690 using Flashtool

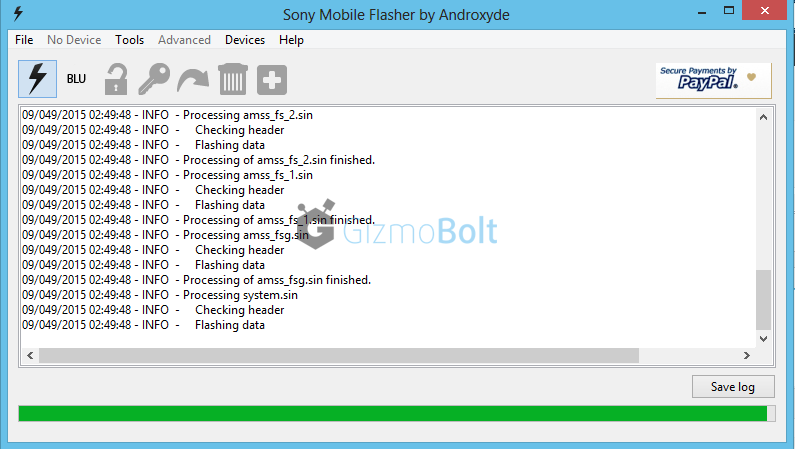
Disconnect phone as soon as flashing is finished.

Step – 10 Disconnect phone

Now reboot your phone. First reboot after the update will take some time.

Flash 23.1.A.0.690 ftf on Xperia Z2

You must have Android 5.0.2 Lollipop 23.1.A.0.690 firmware installed on your Xperia Z2 now.

Xperia Z2 Lollipop update INDIA

Try the above mentioned steps carefully, let us know if you are stuck anywhere. Drop your comments below.

Install Xperia Z2 What’s New, Movie Creator, Sony Podcast, Simple Home apps on Xperia devices

Xperia Z2’s many KitKat features and apps have been ported to other Xperia smartphones running android 4.3+ today viz. Xperia Z2 Smart call handling feature port, Xperia Z2 Camera apps Addons port – Creative Effects, AR Effect 2.0.4 , Background Defocus 1.1.7, TimeShift Video port and Xperia Z2 KitKat Media apps viz. Movies 6.1.A.0.4 and Walkman 8.1.A.0.4 app port on rooted Xperia smartphones and Xperia Z2 Phone Answering Machine port.

Now a few more Xperia Z2 KitKat apps like What’s New, Movie Creator 1.1.A.0.1 version, Sony Podcast 1.1.A.0.0 version, Simple Home 1.0 version have been ported to Xperia devices booth rooted as well as unrooted devices by XDA Dev Levered. Unrooted Xperia Smartphone users running android 4.3+ can now install atleast below mentioned 4 Xperia Z2 KitKat apps.

Download Xperia Z2 KitKat apps

Below mentioned 4 files work on both rooted as well as unrooted devices. Install like a normal apk.

Download Xperia Z2 What’s New app

Download SonyEntrance.apk 

Access “What’s New” app from the app drawer like you launch Google Now.

Xperia Z2 What's New app

Download Xperia Z2 Movie Creator app

Movie Creator 1.1.A.0.1 version

Download Movie Creator.apk

Go to Album app, select any movie and then you will see below an option to edit movies like you can trim them or slow any portion of it.

Xperia Z2 Movie Creator 1.1.A.0.1 version

Download Xperia Z2 Simple Home Launcher

Simple Home 1.0 version

Download SimpleHome.apk

Now you can access to Xperia Home launcher, Simple Home is such a launcher.

Xperia Z2 Simple Home 1.0 version

Xperia Z2 Simple Home Launcher

Xperia Simple Home Launcher

Download Xperia Z2 Sony Podcast app

Sony Podcast 1.1.A.0.0 version

Download SomcPodcast.apk

You can access this app from new Movies 6.1.A.0.4 app only.

#For Rooted users

If any of above is not installing or giving FC, flash the below mentioned files.

Download Media Apps Lib v2.zip

As soon as more Xperia Z2 KitKat apps and features are ported we will post them here, stay tuned till then 🙂 They worked fine on non-rooted Xperia Z1, Xperia SP, Z, you can also try on Xperia ZR, ZL, Z Ultra, L, M, C etc. Great work by Levered once again 🙂

Do let us know if above apps worked on your handset especially nonrooted users. Drop your comments below.

Install Xperia Z2 Phone Answering Machine port on Xperia Smartphones

We have seen so many Xperia Z2 features and apps getting ported till now like Xperia Z2 Smart call handling feature port, Xperia Z2 Camera apps Addons port – Creative Effects, AR Effect 2.0.4 , Background Defocus 1.1.7, TimeShift Video port and Xperia Z2 KitKat Media apps viz. Movies 6.1.A.0.4 and Walkman 8.1.A.0.4 app port on rooted Xperia smartphones but now comes the most interesting one of all i.e. Xperia Z2 Phone Answering Machine port.

XDA dev Levered has made this Xperia Z2 Phone Answering Machine port and it is working fine on Xperia SP, though will work on other rooted Xperia Smartphones also. Let’s see how you can install this port. It works only for devices featuring android 4.3 or above.

To install Xperia Z2 Phone Answering Machine port, your device must be rooted. Download the below mentioned file.

Download Phone Z2.zip

Extract it and push SemcPhone.apk in System/App folder and then navigate to System/etc folder and extract the all content of etc folder of above downloaded zip folder in in System/etc.

Xperia Z2 Phone Answering Machine port

Make a backup of everything you add and replace or you may end up getting bootloop if done anything wrong. Check the official thread by Developer on XDA for any doubt. All credits to Levered for his hard work 🙂

Try it fellas and let us know if it worked on your device or not. Drop your comments below.

How to Update manually Xperia phone by flashing ftf file via Xperia Flash Tool

The best way to update your Sony Xperia phones is always via PC Companion or via Sony Update Service. Well in case your phone shows no notification of the official updates after connecting to PC Companion or Sony Update Service (SUS) then you always flash the original firmware’s ftf file on your phone via Xperia Flash Tool. Read our full tutorial below.

How to Flash ftf file manually on Xperia Phones ?

  • Download the “ftf file” of your Xperia device which is must needed in any case. 

Use Google search to get the desired ftf file for your Xperia device. You can get some of the ftf files on our blog also. Check below links.

Manually Install Xperia S LT26i /SL/Acro S Jelly Bean 6.2.B.0.211 firmware ftf file – Official Update

[ OFFICIAL UPDATE ] Xperia Z C6603 Android 4.1.2 Jelly Bean 10.1.1.A.1.253 firmware ftf files.

[ OFFICIAL UPDATE ] Xperia P LT22i Jelly Bean 6.2.A.0.400 firmware ftf files.

[ OFFICIAL UPDATE ] Xperia TX LT29i Jelly Bean 9.1.B.0.411 firmware ftf files.

[ LEAKED UPDATE ] Xperia Ion LT28i Jelly Bean 6.2.B.0.203 firmware ftf files.

[ LEAKED UPDATE ] Xperia S / SL Jelly Bean 6.2.B.0.197 firmware ftf files.

[ PORTED UPDATE ] Xperia U ST25i Jelly Bean 6.2.A.0.400 on 3.0.8 old kernel  firmware ftf files.

  • After getting the ftf files for your phone, now download the Xperia Flash Tool from given below link.

Download flashtool-0.9.10.2beta6-windows.exe

Windows Version 0.9.10.2 Beta 6

Supported Xperia Devices for updating via Flash tool:-

Xperia go (ST27i), Xperia neo V (MT11i),  Xperia ray (ST18i), Xperia P (LT22i), Xperia ZL (C6503), Xperia Z (C6603), Xperia PLAY (R800i), Xperia E dual (C1605), Xperia E (C1505), Xperia T (LT30p), Xperia S (LT26i), Xperia arc (LT15i) , Xperia arc S (LT18i).

There may be some more phones supported, do check in the supported phone list in the Flash Tool, if your device is not there, add it manually 😛

  • Download the Flash tool on your PC and install it. Let’s say you have installed it on folder named “C:\Flashtool”. Open the folder and find the folder named “drivers”, look for program “Flashtool-drivers” as you can find below.

install Xperia Flashtool in PC

  • Now run the program “Flashtool-drivers” as Admin. As soon as it opens, check under option “”Select components to install” and find the phone for which you want to flash the ftf file. Suppose you want to flash files for Xperia P, then we will tick mark the option “Xperia P, U and Sola Drivers”, “Flashmode drivers” and “Fastboot drivers” to install the concerned drivers of the phone. Click the “install” button and wait till drivers are installed on your PC. Check image screenshot below.

Installing FlashTool xperia P drivers

  • Now as soon drivers installation is finished. On your PC, navigate back to “C:\Flashtool” and in the folder named “firmwares”, please paste the downloaded ftf file for your concerned phone firmware.
  • Open “FlashTool.exe” file from folder “C:\Flashtool”. As soon as you open it, check written “Device disconnected at the end” in dialog box. Check image.

Installing FlashTool

  • Switch off your phone,wait for 30 seconds, now connect your USB cable of phone to PC and the other end on your phone’s USB port. While inserting USB cable in your phone’s port, hold “Volume Down” button and then insert cable. You will see green light in notification LED which means your phone has been connected successfully in flashmode. See below, you will find “Device connected in flashmode” written in the Flash tool window.

FlashTool installing

  • “Notice the Black Lightning icon in the top left corner”, Click on it, as soon as you click, it will as k you to choose from two options listed. Choose option “flashmode”. See below.

updating xperia firmware ftf via flashtool

Follow next Step carefully, any damage caused to your phone will be your responsibility. We are not at all responsible for that.

  • Now from “Select source folder” option please navigate to “C:\Flashtool\firmwares” and choose the firmware ftf file which you pasted in this folder. After doing this from option “Select a firmware” choose your listed firmware ftf file and check mark the option “Wipe Data”. Do check mark other options if you want, you must know what they do, don’t do anything stupid here please. Under option “Misc” , check mark the option “No Final verification” if you are on Android 4.0.4 ICS Stock version. Click Ok, then. See below image.

installing ftf via xperia flash tool

  • As soon as you click OK, Flashtool will now prepare files for flashing which you can see on the Flash Tool open window panel, check below.

How to Flash via Xperia Flash Tool

  • As soon as files are prepared, the selected firmware ftf will be installed on your Xperia device.

Done now hopefully if you performed every step carefully. The first reboot in the phone after installing ftf file is very slow, it will be OK after that. If you have got any confusion on How to Update manually Xperia phone by flashing ftf file via Xperia Flash Tool, do let us know in the comment section below, we will help you out 🙂