


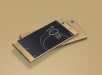


Sony Xperia Z2 the latest buzz among Xperia devices has been dismantled and got its first teardown treatment today. Xperia Z2 features 5.2″ 1080p screen display, Snapdragon 801 SoC, 3 GB RAM, Adreno 330 GPU, 8.2mm thick and 163 grams in weight. Just like other Xperia flagships Xperia Z2 features IP55 and IP58 water and dust resistance feature with non removable 3200 mAh battery.
Xperia Z2 has been officially launched in Taiwan a few days back; 4G LTE version of China Mobile carrier has been dismantled by folks at Cnmo Mobile CN exclusively. Let’s see what Xperia Z2 holds inside it in terms of hardware parts and the area of placement of various parts.
Xperia Z2 disassembly guide
Do not try the below Xperia Z2 disassembly guide on your own, it will void your warranty; only for professional experts.

To start with Xperia Z2 disassembly guide, thin sheet of iron pray bar is used to counter the glue first the middle part of bottom back panel than at edges.

After poking the glue at all sides back panel of Xperia Z2 is removed starting from the sides gently.

Finally back panel of Xperia Z2 is removed. Back side of battery and Xperia Z2 motherboard is spotted. Yellow tap is spotted around all sides of battery.

Back glass panel of Xperia Z2 looks very thin in thickness.

Below you can see metal covering holding Xperia Z2 motherboard from outside.

Sony transducer is present at bottom of battery.

Now with the help of right screw driver, loose all screws to open the battery covering and motherboard outer covering.

Removed all 6 screws, choose your screw driver based on screw’s size.

Below you can see the 3200 mAh battery of Xperia Z2 removed. Battery Ratings is 3.8V, 12.2 Wh 1/CP5/60/71

Remove all SD cards, SIM card, USB cables and switch off the phone while doing this process.

Take a close look of Xperia Z2 20.7 MP rear cam with Sony “G” Lens removed.

Below you will see the Xperia Z2 motherboard rear view.

Below it is front view of Xperia Z2 motherboard. Front cam, SIM card slot, Micro SD card slot and USB are is attached to it. Mid portion is covered by metal covering. All ports have metal covering on it.

Motherboard removed, now you can clearly see 3.5mm headphone jack connectivity point.

A close look at Xperia Z2 vibrator and speaker.


Below you can see RF line ( used for enhancing network and Wi-Fi signals ).

Fabricating cables are neatly placed.

Metal covering removed from Xperia Z2 motherboards and all ports.

A close look at Xperia Z2 motherboard fabrication.


Qualcomm PM8941 power management chip.

Xperia Z2 features 3GB RAM and has Samsung K3QF7F70DM-QGCF – SDRAM memory chip fitted inside it.

Xperia Z2 Speaker IC TFA9890 chip.

Xperia Z2 features 16 GB internal storage and is fitted with Samsung KLMAG2GEAC – B001

Xperia Z2 fitted with Qualcomm WCD9320 audio decoder chip for good audio sound.

Xperia Z2 SKY77619-chip multi-band power amplifier.

SKY77653 power amplifier chip in LTE variants.

RF transceiver chip WTR1625L to increase the number of bands for connectivity options.

Qualcomm LTE chip WTR2100

Qualcomm chip QFE1101 to reduce battery consumption in 4G network areas.

Xperia Z2 front cam close up view.

Xperia Z2 Micro SIM card slot.

Xperia Z2 Micro SD card slot.

Xperia Z2 USB port.

Finally all parts of dismantled Xperia Z2 collectively placed.

Sony has followed almost same design of fabrication of internal parts for H1 flagship Xperia Z2 as seen in Xperia Z1. Soon we expect Sony to release Xperia Z2 in all regions of the world. Wordings say that stock will be limited when Xperia Z2 comes in market and it may come around 10-12 April in India.
Enjoyed the Xperia Z2 disassembly guide guys, let us know. Drop your comments below.
Must Read :
 Lollipop Call Recording MOD for Xperia Z3, Z2 & Z1
 Xperia Z2 23.2.A.1.62 firmware update rolling
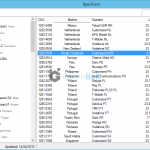
 23.2.A.1.62 firmware certified for Xperia Z2, Z2 Tablet
- Sony confirms official changelog of 23.1.A.1.28 firmware update for Xperia Z2 & Xperia Z3 series
 Xperia Z2 23.1.A.1.28 firmware update rolling
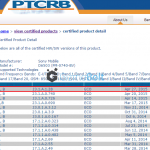 Xperia Z2, Z2 Tablet 23.1.A.1.28 firmware certified
 23.1.A.0.740 firmware rolling for Xperia Z3, Z2 carrier handsets
 23.1.A.0.740 firmware certified for Xperia “Z3” & “Z2” series
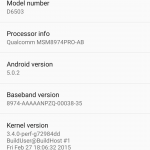 Xperia Z2 23.1.A.0.726 firmware Lollipop update rolling – X-Reality & Vivid mode working now
 How to flash Xperia Z2/Z3 Lollipop 23.1.A.0.690 ftf using Flashtool Manually ?


(Y). I was looking for the reason behind the heating issue.
Looks like awesome! Thank you so much.
What’s the glue used to stick the back panel of Z2?
If I dissemble it, (only the glass panel) how can I paste it back?
Hola tengo el cristal trasero roto xperia z2. Y quiero cambiarlo, e visto algún video de como lo hacen, pero no se si atreverme, es tan fácil como se ve, o me aconsejan llevarlo al servicio técnico.